How to create Automations
Check out our new surveys with built-in automations for an even easier automation setup!
Automations is a powerful tool that make using Trustmary even more simple, while also making your NPS measuring, feedback and review gathering quite a bit more efficient. With automations you can automate the whole process from beginning to the end.
To start using automations, navigate to Automations in the navigation bar. Once there, begin creating your automation by clicking Create new in the top right.

In the next screen, give your automation a name and proceed to the next screen by clicking Create new.

You're directed to the automation editor. Here you can see among other things a preview of your automation's steps & triggers, which you can also add by clicking their respective buttons. We will take closer look at all these in the next section.

Here you can add triggers to begin the automated sequence and add steps the automation will execute after it is triggered.
There are four types of triggers to choose from:
Add contact to list - This will trigger the automation when a contact is added to a chosen list
Update contact on list - The automation will trigger when an existing contact is updated
New survey answer - The automation will be triggered when a survey is answered.
Recurring trigger for contacts in lists - This will trigger the automation a certain contact list with a set interval.
You can also choose multiple triggers, if it suits your use case.

There are six types of steps:
Wait - Pause the automation and continue it after a set time
Wait until conditions are met - Schedule the next action to execute when certain conditions are met (currently only a specific time of day)
Wait for answer - Wait for an answer for a set amount of days and send a reminder
Send message - Choose a message and send it to selected contacts.
Send reminder after - Sends a reminder message for recipients that haven't answered to the survey in question.
Add contact to list - Adds the contact the automation is triggered for to a list.

You can also Create steps from the toolbar. In addition, you can create messages or choose an existing one, and edit the general settings of your automation.

Once you're ready, you can review the changes you've made by clicking the Publish now button, which is located in the drop-down menu in the top right corner.
If you're happy with what you see, you can click the Publish now below the changes to update your automation.

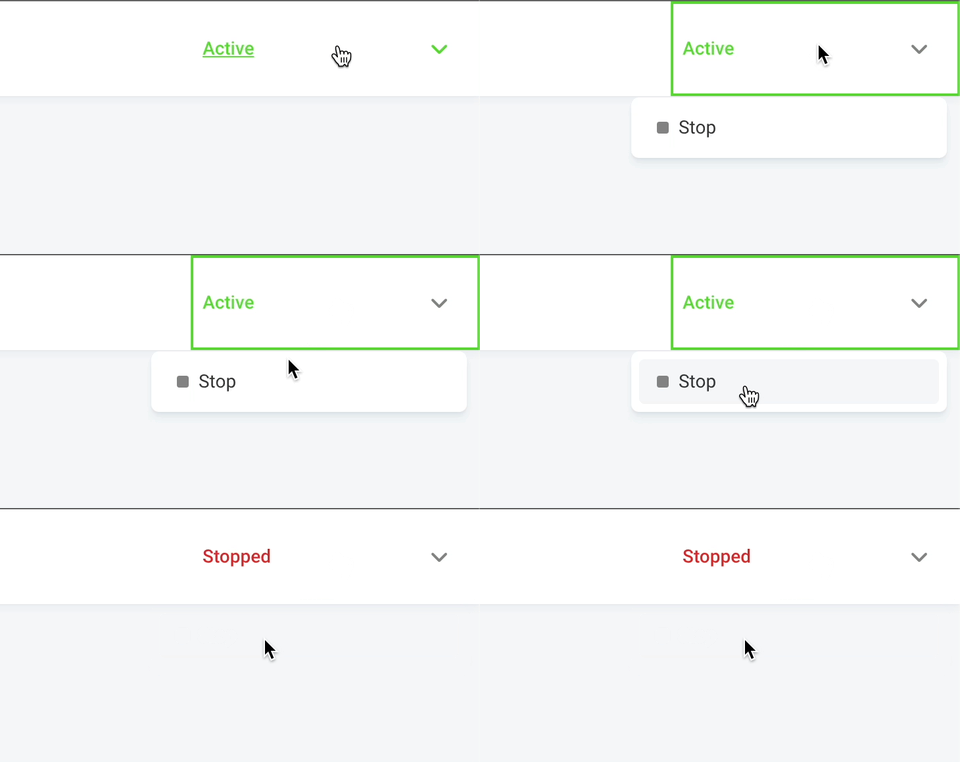
Once the automation is published, a green text that reads Active appears in the place of the orange Draft text, telling you the automation is live. Here you can also stop the automation, if needed. After stopping the automation, the text turns red and reads Stopped.

Getting started
Automations is a powerful tool that make using Trustmary even more simple, while also making your NPS measuring, feedback and review gathering quite a bit more efficient. With automations you can automate the whole process from beginning to the end.
To start using automations, navigate to Automations in the navigation bar. Once there, begin creating your automation by clicking Create new in the top right.

In the next screen, give your automation a name and proceed to the next screen by clicking Create new.

You're directed to the automation editor. Here you can see among other things a preview of your automation's steps & triggers, which you can also add by clicking their respective buttons. We will take closer look at all these in the next section.

Building the automation
Trigger/step selection
Here you can add triggers to begin the automated sequence and add steps the automation will execute after it is triggered.
Triggers
There are four types of triggers to choose from:
Add contact to list - This will trigger the automation when a contact is added to a chosen list
Update contact on list - The automation will trigger when an existing contact is updated
New survey answer - The automation will be triggered when a survey is answered.
Recurring trigger for contacts in lists - This will trigger the automation a certain contact list with a set interval.
You can also choose multiple triggers, if it suits your use case.

Steps
There are six types of steps:
Wait - Pause the automation and continue it after a set time
Wait until conditions are met - Schedule the next action to execute when certain conditions are met (currently only a specific time of day)
Wait for answer - Wait for an answer for a set amount of days and send a reminder
Send message - Choose a message and send it to selected contacts.
Send reminder after - Sends a reminder message for recipients that haven't answered to the survey in question.
Add contact to list - Adds the contact the automation is triggered for to a list.

Toolbar
You can also Create steps from the toolbar. In addition, you can create messages or choose an existing one, and edit the general settings of your automation.

Publishing
Once you're ready, you can review the changes you've made by clicking the Publish now button, which is located in the drop-down menu in the top right corner.
If you're happy with what you see, you can click the Publish now below the changes to update your automation.

Wrapping up
Once the automation is published, a green text that reads Active appears in the place of the orange Draft text, telling you the automation is live. Here you can also stop the automation, if needed. After stopping the automation, the text turns red and reads Stopped.

Updated on: 24/02/2025
Thank you!
